How to setup a MicroSD
Starting from version vx.x.x, Zeal 8-bit OS brings support to microSD cards for Zeal 8-bit Computer target. To operate properly, the card must have one partition formatted in ZealFS (v2) filesystem.
Requirements
Here are the requirement to use a microSD card:
- Zeal 8-bit Computer running Zeal 8-bit OS
vX.X.Xor newer (see below) - Zeal Video Board, since the microSD port is on it
- An SDHC card, which ranges between 4GB and 32GB included, check the marking on the card itself
- A Master Boot Record (MBR) present on the card, this should be the case of all the cards that have partitions, see details below
- Make sure the data on your card are not sensitive, since the driver is still in beta version, it is highly recommended to use a card that will be solely dedicated to Zeal 8-bit computer (in case of corruption)
- Optional: ZealFS repository, available on Github, to mount the partition on your host computer and transfer data from and to it
Zeal Disk Tool
Zeal Disk Tool is a lightweight utility designed to simplify the process of creating ZealFS partitions on microSD/TF and CompactFlash cards. It features a simple GUI and is compatible with Linux, Windows, and Mac OS.
Here are the steps to get a ZealFS partition:
- Download the most recent release of Zeal Disk Tool from the official Github release page or compile the program from source.
- On Windows, if you downloaded the
.ziprelease, extract the.exefile from it - Run the program with Administrator permissions:
- On Windows, right-click on the binary
zeal_disk_tool.exe, and click onRun as Administrator - On Linux, open a terminal where the
AppImageis located and run it viasudo ./zeal-disk-tool-v0.2.0-linux-i386.AppImage(replacezeal-disk-tool-v0.2.0-linux-i386.AppImagewith the image you actually downloaded) - On Mac OS, similarly to Linux version, the binary must be run with
sudopermissions.
- On Windows, right-click on the binary
- The graphics interface should show up. Your interface may be different depending on the number of partitions already available on your disk.
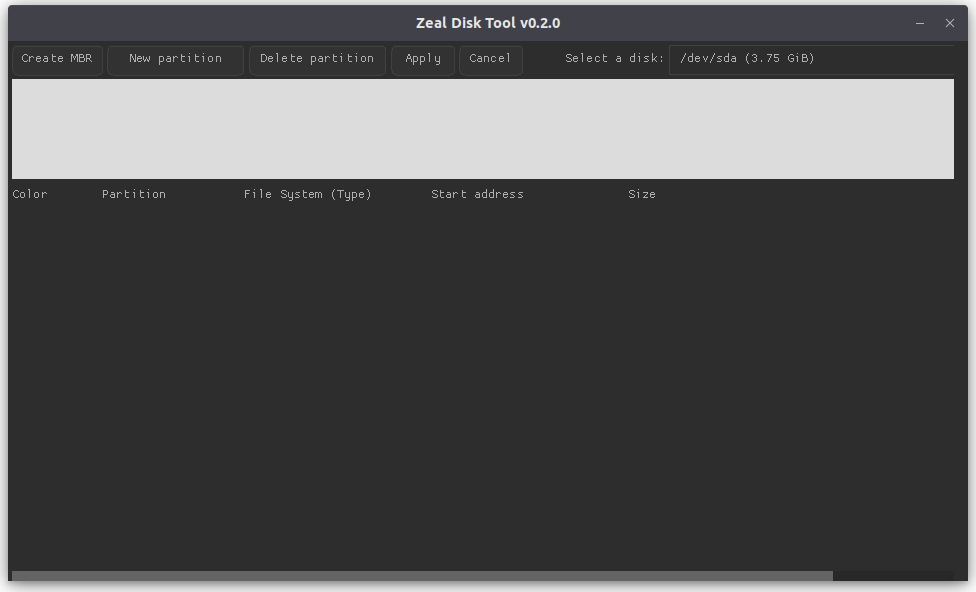
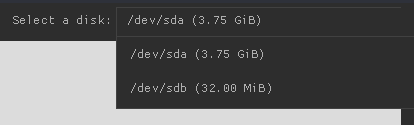
- From the dropdown menu in the top-right corner, select your disk. Verify the disk size (microSD or TF card) to ensure you are modifying the correct one. Please note that the disks that are bigger than 64GB will not be shown! This is intended, to prevent accidental modification of the main hard drive of your host computer.
- Optional: Check if your disk has a Master Boot Record by clicking the
Create MBRin the button bar. A message box will notify you whether the disk already has an MBR or not. The MBR is necessary since it is the data structure that stores the information about the partitions on a disk. - Create a new ZealFSv2 partition by clicking
New partitionin the button bar.
- Choose the size of the partition you want to allocate for this new partition, keep in mind the following:
- For performance reasons, the partition will be aligned on a 1MB bound
- The available sizes are power of two (16MB, 32MB, 64MB, ...)
- ZealFSv2 supports partitions up to 4GB
- The larger the partition, the more space files and directories will occupy, for example, on a 4GB partition, a file will take at least 64KB, even if its content is in reality composed of 10 bytes
- Large partition size can significantly impact read and write performance
- As of the time of writing this article, a 16MB partition strikes a good balance between space and performance. For more details on partition and disk sizes, you can visit ZealFS project page
- If the size you want is not listed in the dropdown menu, this means that the available space for the new partition could not be found, this can be the case if the available free space on the disk is not contiguous. You can delete unwanted partitions from your disk first but be careful, this will provoke data loss!
- Press
Createbutton after selecting the size you want.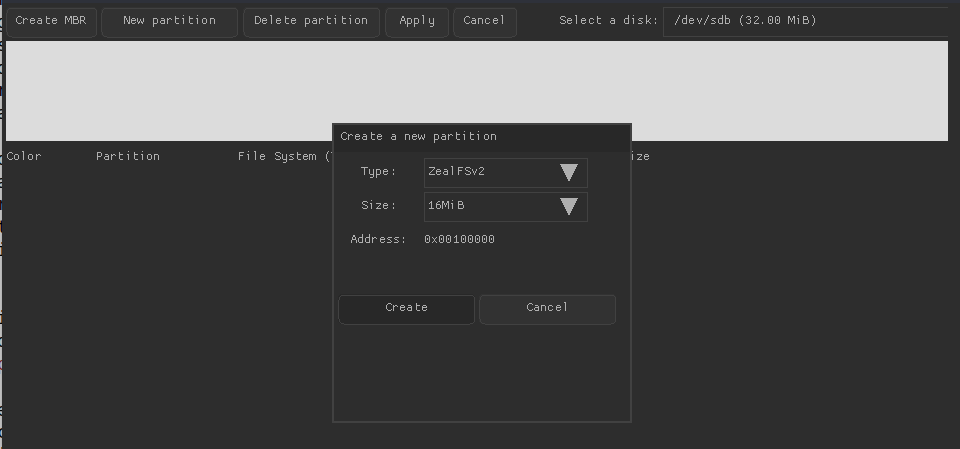
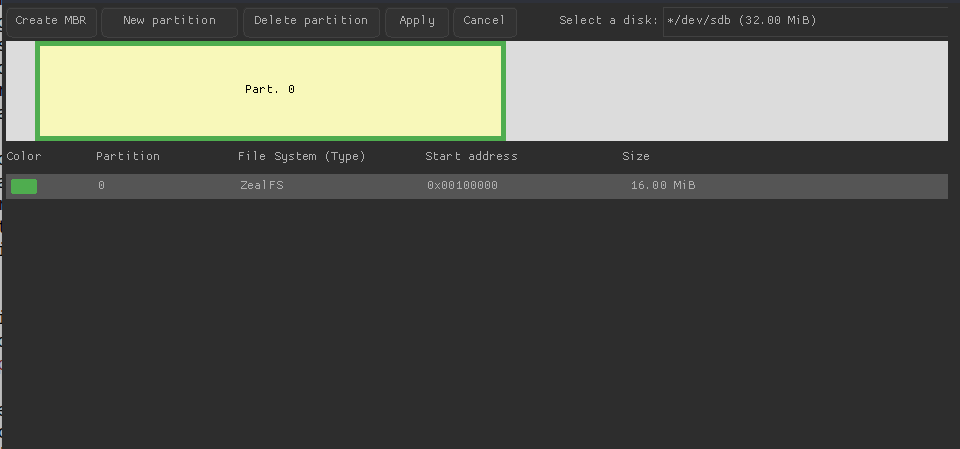
- The new partition should be visible in the main diagram, for example with a 16MB partition:
- The disk name in the disk list should now be preceded by a
*, meaning that the disk has pending changes. Indeed, the changes, such as creating new partitions or deleting partitions are not immediate, they are cached - To write the new partition to the disk, you need to apply the changes: click the
Applybutton, and confirm withYes
- This will after the
Successmessage is shown, the disk name in the list is no more preceded by a*, meaning that no change is pending anymore.
That's it! You now have a ZealFSv2 partition on your disk, you can unplug it from your computer and plug it on your Zeal 8-bit Computer!
Zeal 8-bit OS version
Currently, the ZealFSv2 implementation as well as the SD card driver have not been officially released in the OS. As such, to be able to have ZealFSv2 and SD card support, you will need to download and build the OS branch named feature/tf_driver_support from source, you can check the official Github page for that.
Make sure to enable TF driver support from the menuconfig (make menuconfig) before compiling.
After compiling, you will need to flash the OS binary to your Zeal 8-bit Computer thanks to the bootloader.
If you need any help with compiling the OS or flashing it, feel free to contact me.
Troubleshooting
Q: When will the microSD/TF card support be officially merged in Zeal 8-bit OS?
A: microSD/TF card support has already been merged and released in Zeal 8-bit OS v0.6.0!
Q: Is ZealFS v2 backward compatible with ZeaFS v1? What happens will happen to the EEPROM on Zeal 8-bit Computer?
A: In order to provide better performance and memory organization, ZealFS v2 is not backward compatible with ZealFS v1. However, it still provides support for very small memories with a very low overhead. As such, you will need to format the EEPROM with ZealFS v2 and it will work as usual. Make sure to backup your data first if you don't want to loose them (make a disk image with an external flasher or send the data via UART).
Q: In Zeal Disk Tool, I only see one big partition on my disk, how to create a ZealFS v2 partition?
A: Via the GUI, simply delete the big partition (make sure to backup your data FIRST!), and create a new partition as explained above. Don't forget to apply the changes